Expository Essay Example - Easy Recipes for College Students
An expository essay is probably the type of writing one encounters the most in everyday life because an exposition aim to explicate and clarify something for the readers and this type of essay encompasses a lot of writing variations including cause and effect essays, comparison and contrast essays, as well as process essays (instruction manuals and recipes).
Here is an example of an expository essay (how-to essay):
All college students, freshman or not, at some point have had enough of cold pizza and cereal to get through the day. It is that one quiet morning where you just woke up wanting some warm and freshly-cooked food, not that left-over Chinese takeout you had delivered yesterday. It is not helping either that you are not in good terms with pans and fire. The foremost step to defeat late night real food cravings is to overcome your fear of making food because as a college student journeying a life far from home, you need to learn at least the basic recipes you can come up with your pantry staples. Besides, you do need that fresh energy to finish your academic requirements. Cooking can be a very relaxing activity especially if you have other people to enjoy it with, so get up now and grab your ingredients.
What do you need?
What you can concoct out of your pantry depends on the staples you have available, and believe it or not, stocking up your pantry is not only for your most awaited zombie apocalypse. It is for your own health too. Let us divide this into two, shall we?
1. The Kitchen
For a student who lives alone or with two other more housemates , you will survive with one skillet, one stock pot, one large chef knife, a paring knife, and a working stove. We trust that you have your plates and utensils packed by mom somewhere. If you don’t, you can always drop by Target to grab some essentials. You do not need the perfect and complete kitchen, so do not stress over that so much. You are a college student, not Julia Child, however, having a chopping board would be nice too (you know, for that fancy wine, cheese, grapes, and cold cuts thingy we all see in Instagram).
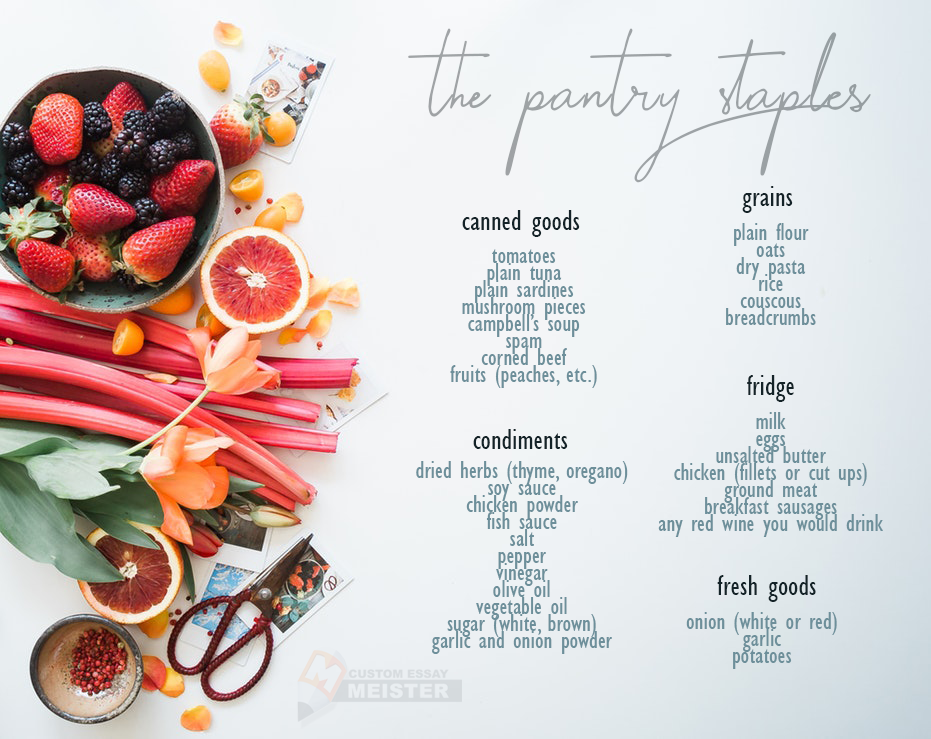
2. The Pantry Staples
This could be one of the most important lists in our lives (safest choice will always be the plain or originals):
Okay, now we know that this looks too much, and it is too much if you shop them all in one go – which fortunately, you do not have to. Now that you have been made aware of what every kitchen should hold at least, here are the quick and easy recipes that every college student should try instead of dialing that pizza guy’s number again (no, do not touch that cereal either).
Pan-Roasted Chicken
Some people prefer thighs, while others prefer breast. We are happy to inform you that this recipe can accommodate any part of chicken you want, but we do recommend boneless breasts or thighs. Prepare all ingredients and place them near you because this recipe only takes a few minutes to cook.
Ingredients:
1. Medium size chicken cut ups (thigh or breast, quantity depends on how many will eat – yes you can cook just one to two pieces)
2. Garlic (three cloves for each piece)
3. Dried rosemary
4. Butter
5. Vinegar (Balsamic, Sherry, or Cane, etc.)
6. Olive Oil (for browning)
7. Salt and Pepper (to taste)
Preparation:
1. Finish reading the entire recipe before cooking.
2. Pat your chicken dry then season both sides generously with salt and pepper.
3. Peel and mince garlic cloves, then set aside.
4. Preheat your olive oil in a skillet on medium-high heat, drop the fire to medium once the oil shimmers.
Cooking:
1. Brown your chicken, skin side first. Leave your chicken in the pan for three minutes and be patient, do not do anything other than counting the seconds up to three minutes to allow the skin some crisp. Flip your chicken to brown the other side, and let it brown for two minutes.
2. Place your chicken on a plate and set aside. Do not worry about it being half-cooked for now since you will put it back into the pan later on.
3. Drop your heat to low then add a spoonful of oil. Allow the pan to adjust to the heat then add a teaspoon of dried rosemary. Move the herb around the pan for a minute, then add your garlic. Stir it around until garlic starts to brown. Keep your eye on the pan, and once you see the garlic change to opaque white, add your balsamic vinegar.
Note: It is highly important that your fire is on low because dried herbs and garlic burns very quickly on high heat. You can add two tablespoons (or a huge splash of balsamic vinegar the first time you introduce the said ingredient to the pan). The addition of vinegar on this step is the key to cool down the pan and prevent the garlic and herbs from toasting. You can adjust it later on.
4. Keep stirring on low heat until you see tiny bubbles forming.
5. Add in a tablespoon of butter. Stir the sauce together once butter melts, then taste. You can adjust the taste with salt and pepper, but be careful on the salt because remember that your chicken has been seasoned. If you want it to taste a little fruitier, you can add more vinegar. But if it is too fruity (tart and sweet) for you, you can add a bit more butter. You can always adjust the sauce based on your preference as long as you keep it on low heat. You can also turn the heat off once in a while if you feel like the reduction is too quick for you.
6. Once you are satisfied with the sauce, add your chicken skin side up to the pan, then spoon the sauce over the meat. Place the lid and leave it on low heat for five to seven minutes (if you used chicken thighs), and three to five minutes (if you used chicken breasts).
Note: This recipe is highly adjustable, hence, the waiting time for it to roast in the pan can shorten for much smaller pieces (e.g. chicken fingers) and bigger pieces (e.g. quarter legs). Do not be afraid of the sauce reduction because your chicken is already soaked up in it, however, do not leave it on fire for more than ten minutes, whatever the cut is because it will dry up your chicken and burn your sauce. Remember that even when the heat is off, the meat will still continue to cook inside.
7. You can serve the chicken on top of rice, with a toast, or with sautéed asparagus or baby potatoes. You can also eat it as is.
Worries and Remedies
- Balsamic vinegar is thick as it is, so, do not panic when it becomes sticky on your pan. If it scares you, turn off your heat, add a splash of olive oil and a tablespoon of water (or chicken broth if you happen to have some), stir it together until combined, then put it back over low fire until bubbles appear. Remember, you can always turn off the heat if you feel like it is eating up your time.
- You can always substitute fresh garlic with garlic powder, but be careful on the powder’s variant as it may be garlic salt. If you got that powder, simply adjust your salt.
- Do not be afraid to salt your chicken, but definitely, do not dump in up to a teaspoon of salt to each chicken. Work with pinches of salt and scatter it over your meat as much as you can. If you feel like you need salt, but is uncertain, remember that you do not have to cook salt, and you can just sprinkle some over your chicken as you eat.
- You can cook up to five pieces in one pan depending on the size. The rule of thumb is to not overcrowd your pan.
- You can use other types of vinegar such as apple cider, sherry, rice, or white wine vinegar, whichever you prefer, just make sure that you allow the vinegar to cook with the other ingredients in the pan to ensure flavor infusion.
- You can use thyme if you cannot find rosemary, and yes, you can definitely use fresh herbs for this. We are simply recommending dried herbs so you can stock it up for a longer time ready for your next recipe.
- Can you add more butter? Yes! But note that chicken produces its own oil from the skin, so take it easy on grease.
- This is not a worry nor a remedy, but this goes well with sauteed french beans or mashed potato.
Easy Spaghetti for One
Any pasta recipe is like your cheat code to a healthy and fulfilling dinner, and thankfully, spaghetti and tomato sauce are so adjustable and easy to make. Above all, you can always choose your meat from fancy meatballs down to canned tuna chunks. We will focus on ground meat for this recipe.
Ingredients:
1. Spaghetti (or whatever you have there, really – but this recipe works best with strand pasta e.g. Capellini, Angel Hair)
2. One medium onion (red or white)
3. Garlic (three cloves) or half a tablespoon of garlic powder
4. Ground beef or pork (amount of meat depends on you)
5. One piece sausage (optional, you can use just one meat, however, sausages are known for savory and smoky flavor)
6. Tomatoes(canned, tomato sauce, or tomato paste - whichever is available)
7. Olive oil
8. Dried oregano leaves (optional)
9. Salt and Pepper (to taste)
10. Cheese (optional for topping: Parmesan, it is not that necessary, but it is a signature)
Preparation:
1. Finish reading the entire recipe before cooking.
2. Mince your garlic and onion, set it aside but keep it on separate containers.
3. If you are going to use a sausage, remove the meat from its casing. Simply slit the sausage vertically then peel it off.
4. The main ingredient for the sauce can be fresh tomatoes (boiled until soft then peeled), canned tomatoes, tomato sauce, or tomato paste.
5. The amount of noodles you will cook depends on you, however, usually, a single-serve spaghetti constitutes approximately 57 grams of dry spaghetti noodles. Most people use their thumb and index finger to measure one serving, whether you add or subtract is entirely your decision.
Cooking (Pasta):
1. Fill your stock pot with water, then let it boil. Once the water boils, add a tablespoon of salt.
2. Wait until the water is on a rolling boil before adding your noodles. Keep stirring so the noodles won’t lump together. Do not add oil into the water because it will prevent your sauce from sticking.
3. Allow your pasta to cook until almost al dente – see the package instructions for your pasta's cooking time, then subtract a minute and a half from it. You will continue to cook your pasta with your sauce.
4. This next step is unorthodox – drain your pasta, but leave it with a cup of the pasta water. This will prevent your pasta from sticking together, and the water will allow you to make your sauce silky later.
Cooking (Sauce):
1. Heat a splash of olive oil on your skillet over medium-high heat. Once oil starts to shimmer, drop your heat to low then add your onion. Cook your onion until translucent then add the garlic, stir for one more minute, and then add your meat.
2. Combine the onion and garlic with your meat, then allow your meat to brown. Note that the meat might produce water but do not worry because this will evaporate. Also, wait until all the water is gone before you decide to add oil because the fat from your meat will render (regardless whether you used ground meat or sausage alone, or both). The meat will break from lumps, before it turns brown so be patient. Spoon out excess oil if there is too much, then add your tomatoes.
3. After adding the tomatoes, you can gradually add the pasta water you kept beforehand to thin your sauce. Allow it a few minutes to simmer, then season with salt and pepper. When you are satisfied with your sauce, you can add the pasta noodles to your sauce and fold it until sauce envelopes the strands evenly.
4. Garnish with dried oregano leaves and top with Parmesan cheese if you have any.
Worries and Remedies
- Read your pasta package instructions so you won’t overcook your pasta. Do not worry about under cooked pasta because you will have to cook it further anyway in the sauce.
- You can add the oregano while your sauce simmers for stronger scent and flavor.
- If your sauce looks a little pale but there is enough acidity from the tomatoes, you can add a splash of soy sauce and/or a dash or two of smoked paprika. Do not add tomato sauce if it’s sour enough already, it sure will color the sauce better, but it will be difficult to counter the taste of sour.
- You can substitute oregano with thyme.
- Adjust the cooking time of your pasta according to its type. Again, follow the cooking instructions of your pasta.
- You can substitute meat with tuna chunks, just add it in place of the meat and cook for two minutes before adding the tomatoes. Canned sardines (in water or oil) works too.
- Yes, you can add olives for garnishing. Yes, you can sauté mushrooms with your onion. And yes, you can skip the meat altogether and use stock powder.
- You do not have to use tomatoes for a sauce. You can just use olive oil, garlic, and Parmesan cheese, and it will still turn out great. Know that there are a lot of recipes for strand pasta.
Fried Chicken
Marinate and fry, really, that is all there is to this recipe. What makes it so much better is you can freeze your marinated chicken up to a week, or leave it in the fridge for up to two days.
Ingredients:
1. Chicken (number of pieces depends on you, but recipe recommends six pieces)
2. Fish sauce
3. Garlic (one whole head)
4. Pepper
5. Flour
6. Egg (2-3 pieces depending on size of the chicken pieces)
7. Paprika or Cayenne (optional)
Marinate:
1. Peel your garlic cloves, then pound them once.
2. In a large bowl (or large zip lock bag), add a cup of fish sauce, all the garlic, and a generous amount of pepper. You can add smoked paprika and/or cayenne into the marinate mix if you want. Mix well. Add in the chicken, then marinate for at least an hour.
Cooking:
1. In a wide bowl, whisk your eggs until smooth.
2. Prepare a wide container for flour. You can add a pinch of salt to your flour, a dash of cayenne, paprika, garlic powder, and pepper if you want.
3. Preheat vegetable oil on your frying pan over medium-high heat. While waiting, dip a piece of marinated chicken into the egg, and then into the flour. Use one hand for dipping the chicken into the egg (wet), and the other into the flour (dry) to prevent mess.
4. Wait until the oil is shimmering, then drop the fire to medium, before you add the chicken. Play your fire between low to medium only – this is very important because you want your chicken to cook all the way through, and not just the skin.
5. Chicken wings cook for about ten minutes, while other parts cook for about twelve minutes. Turn your chicken every two minutes for even cooking.
6. Place fried chicken over drying rack or kitchen towels to remove excess oil.
Quick Gravy:
Skipping this step is on you, but we at CustomEssayMeister love chicken and gravy.
1. Prepare a cup of water and set it aside. Take three tablespoons from the flour you used to coat your chicken if you still have any left, or just fresh flour. Add in a teaspoon each of: garlic powder, chicken powder, cayenne, and pepper.
2. In a skillet, melt two tablespoons of butter on low heat, then add the flour. Technically, you will kind of fry the flour in butter, so wait a few minutes until it turns a little brown.
3. Once flour mix turns brown, add a little dash of soy sauce. Mix well.
4. This is the tricky part: Take the cup of water and slowly add water into the skillet. Work with literally one dash at a time until mixture becomes thin. You do not have to put the entire cup of water into the pan, if it looks like a cup of coffee with cream already, stop. Stir together over low heat until it simmers, then adjust the taste with salt and pepper.
5. Keep stirring until you reach the gravy consistency you prefer.
Worries and Remedies
- If you notice that the chicken turned brown too quickly, turn off the fire, lift the chicken from the pan, and then add oil to cool the pan down a little. Turn heat to low, wait for two minutes before returning the chicken into the pan.
- You can just purchase an instant gravy mix if you want.
- You can use chicken stock instead of water.
- The soy sauce is just meant to darken the gravy, it is not that necessary.
- Do not expect to perfect the consistency of the gravy on your first try. Adjust your next gravy according to your preference the next time. Most of the time, the problem just zeroes in with the amount of liquid being added into the skillet. Of course, do not burn your flour.
- Never ever fry a frozen chicken. Make sure the meat is thoroughly thawed before frying it, or else you will have an under cooked fried chicken, and that is bad for your health.
- Chicken cooks at about 165°F, so if you have a meat thermometer around, it is the best way to determine if your chicken is cooked. Just poke it into the thickest part of your chicken, wait for a few seconds, then see if it’s done.
- It is always safe, especially for beginners, to open the chicken first to see the bone. If there is any blood left, put it back into the pan, and cook until the blood in the bone turns black.
- Practice makes perfect.
-
Note that all expository essays have the same goal: to explain and clarify things. In need of an expository essay soon? Let us help you.